Let Me Show You a Card Trick
I have always been fascinated by new methods of communication. There's something interesting about finding an encoded piece of information and using tools at my disposal to translate it into something that makes sense, whether they be online codebreakers or simply hashing it out on a piece of paper. Some of my favorite examples include the Sebald Code, the Cipher Hunt ARG, and most recently Cipher, the online riddle,
This curiosity naturally carried over to my studies. As a security-minded student in college, I enrolled in a cryptography course to learn more about the systems and means by which information is kept secure. As we covered the section of zero-knowledge proofs, we performed an exercise that opened my eyes not only to breaking ciphers, but also how to engineer them from the ground up.
This exercise uses five playing cards, three red and two black, each with identical backs. The two parties, traditionally named Alice and Bob, each draw one red and one black card, leaving the extra red card face-up on a table. They will encode their private bits (1 or 0) by the choice of which color is placed nearer that center card, then jointly obscure the arrangement through secret rotations.
- Bob looks away. Alice chooses bit
1by placing her red card closest to the center card (or bit0by using black), then flips her two cards face-down and turns away. - After Alice turns away, Bob repeats: he selects red near center for
1(black for0), then places his cards face-down and turns away. - Alice turns to view the five face-down cards in a line, rearranges them into a circle, and secretly rotates the circle by a random 0-4 positions clockwise.
- Alice looks away, and Bob applies his own secret 0-4 position clockwise rotation.
- Both flip all cards face-up. If the three red cards now appear consecutively, then Alice and Bob's bits were both
1. Otherwise, at least one bit is0.
This simple experiment is a recreation of Bert den Boer's Five Card Trick, first published in 1989. This experiment is a clever physical demonstration of Zero-Knowledge Proofs (ZKPs), a cryptographic technique that allows one party to convince the other that a statement is true without revealing any additional information. While not foundational in the development of ZKPs, it serves as a launchpad for educational tools and further exploration into using tangible items like playing cards for privacy-preserving logical computations.
Click to see an illustrated example of the Five Card Trick.
Illustrated Example of the Five Card Trick
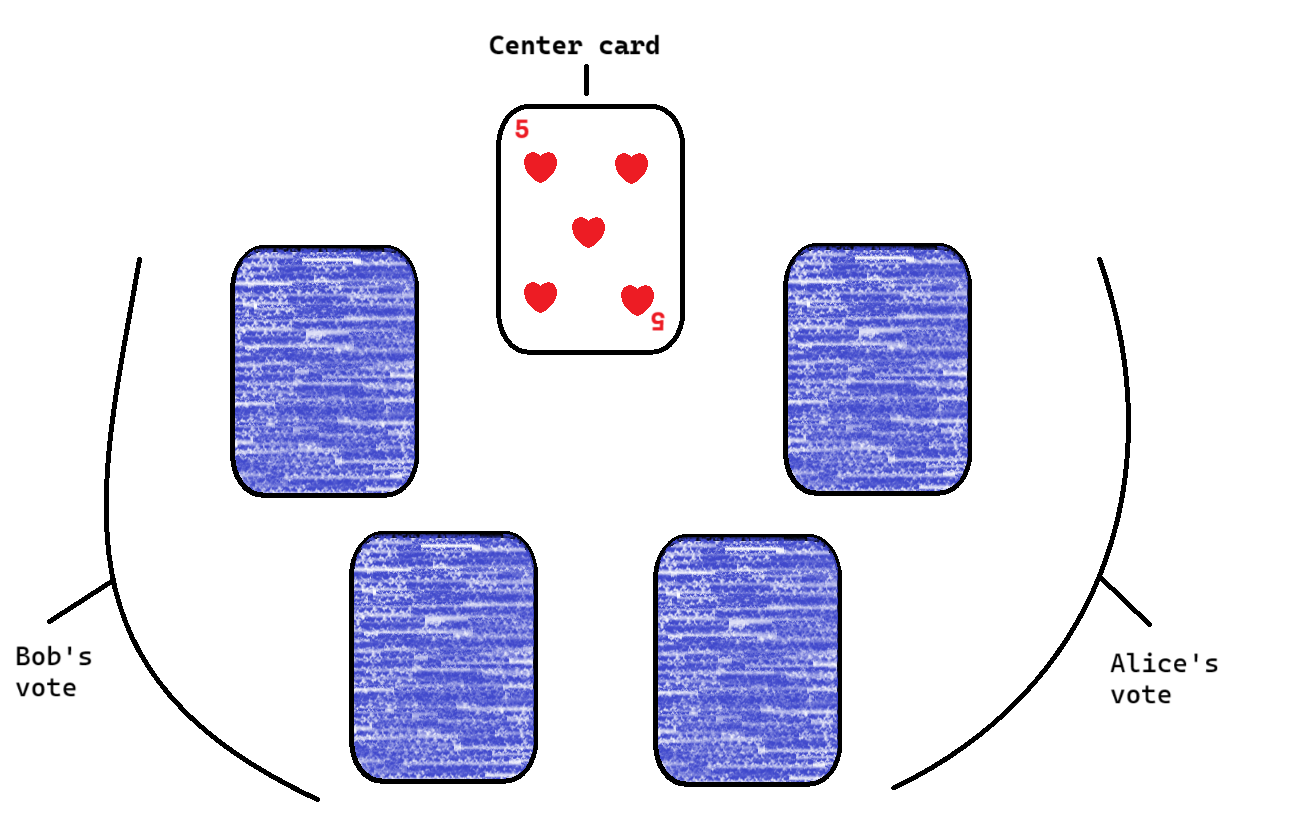
In the first stage of this experiment, Alice and Bob make their selections in confidence while the center card remains face-up. Alice's vote is to the right, and Bob's vote is to the left.
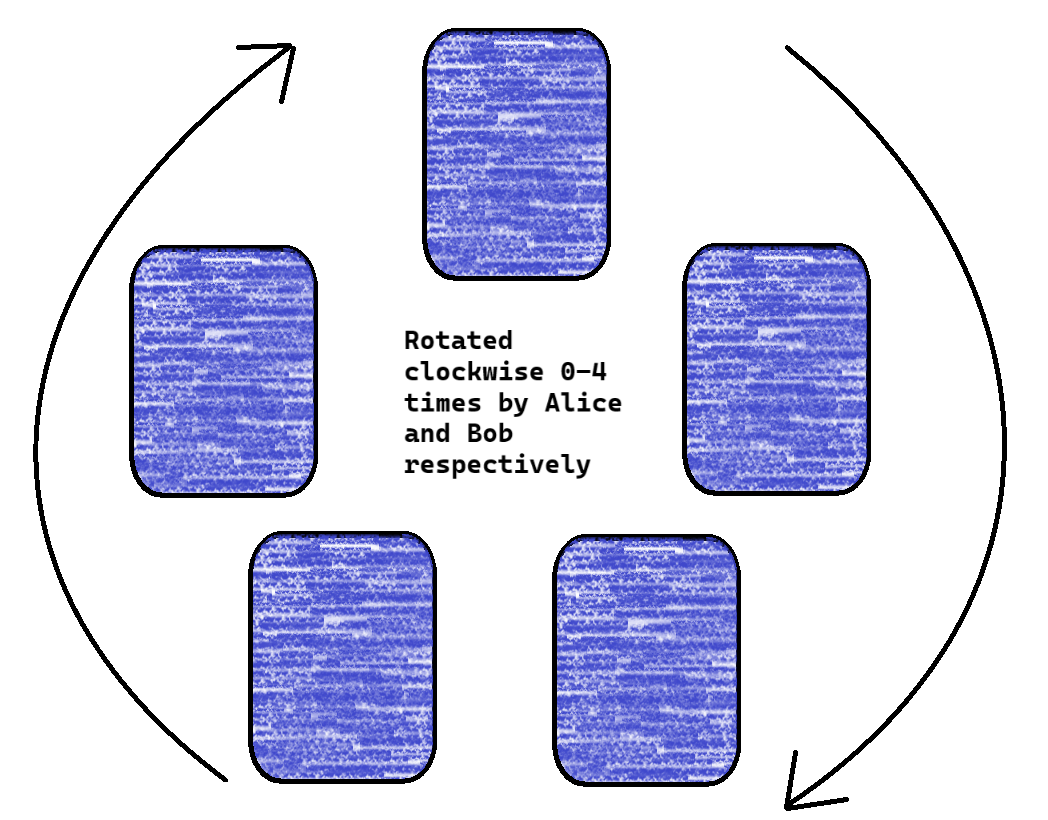
In the second stage, the center card is flipped over and the entire circle is rotated 0-4 times clockwise by Alice, then by Bob.
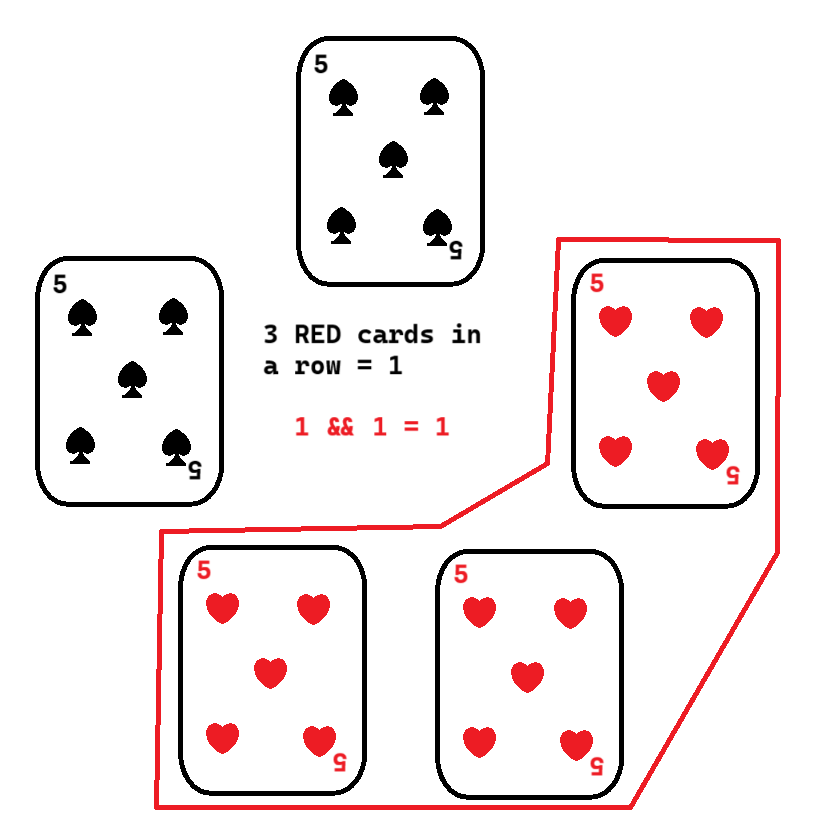
In the event that both Alice and Bob voted 1 (they put their red cards closest to the center card), then no matter how many rotations, the result will be 1. Because the suit and back of the cards are identical, no proof is needed for either party to prove their part of the scheme aside from the result.
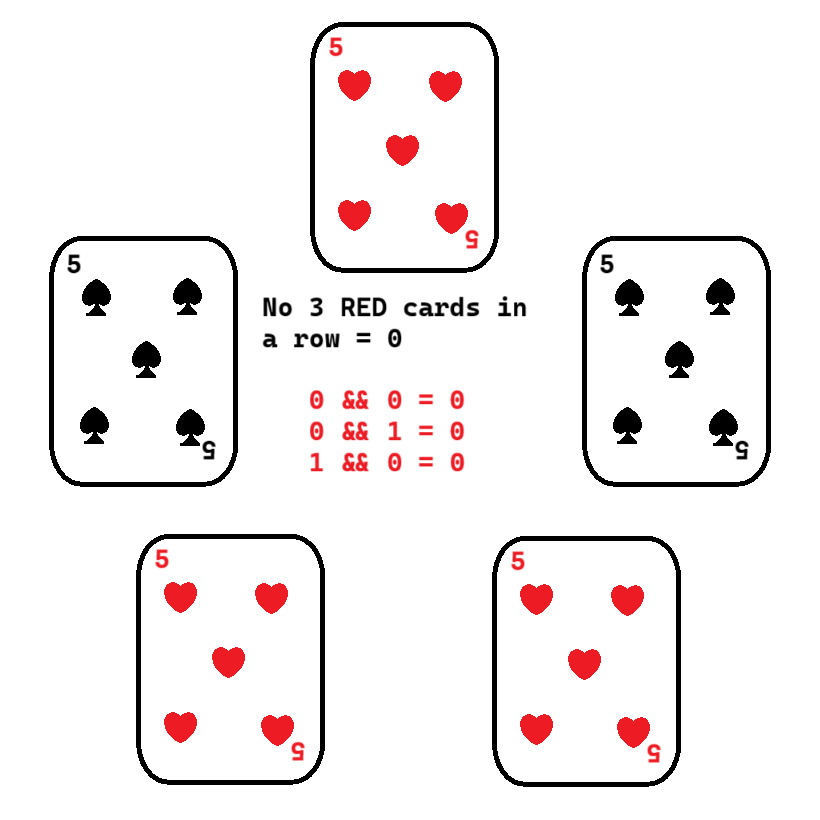
In the event that either Alice or Bob voted 0 (they put their black cards closest to the center card), then no matter how many times the cards have been rotated, the result will be 0. Like earlier, no proof is required from either party to prove their part of the scheme aside from the result.
ZKPs and secure multiparty computation are advanced cryptographic techniques that enhance privacy and security in modern technologies, such as cryptocurrency and blockchain. In the Adventures in Cryptography series, I will explore some of the technologies surrounding this experiment and related topics in cryptography. These topics include:
- First, we will cover Blockchain, where I will emulate blockchain logic through a voting system hosted on Railway.
- Next, we will look at Quantum cryptography, where I will demonstrate some popular crytographic techniques using Jupyter notebooks.
- Finally, we will dive into Cryptanalysis, where I will showcase how to break certain ciphers and cryptographic techniques using a web app hosted on Railway.
Experiments in Blockchain
I thought a practical example of how to demonstrate blockchain technology would be in the form of a voting system, which simulates the logic of blockchain protocols in a fun and interactive manner. I will walk through how the voting system was put together and provide links to access the prototype and my GitHub repository where you can replicate the example on your local machine.
Defining the Scope
The first task is to plan what the system can do and how users will be able to interact with it. Here is a general rundown:
- The app should be able to record exactly one vote from each user.
- Voting should be kept anonymous.
- Votes are stored on the blockchain, where each vote equals one transaction.
- A final tally can be computed from the chain.
With this in mind we can hash out the basic blockchain components:
- The block will hold vote transactions.
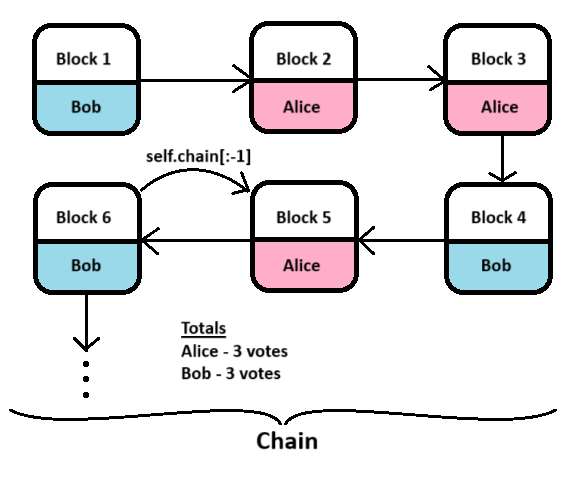
- The chain consists of a list of blocks linked via cryptographic hashes.
- The proof of work will be simplified, but it will still serve its purpose as an integral part of the solution.
- For ease of simulation we will stick to one node and skip the consensus step.
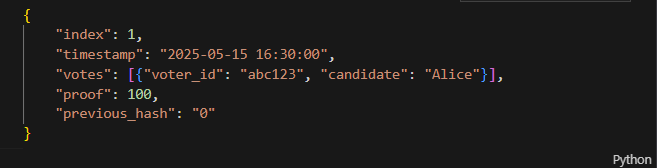
The basic block structure is pictured below.
Crafting the Backend
Using Python as our language of choice, we can begin building the functionality behind our blockchain. We start with the Blockchain class, which includes these key methods:
- The constructor, where the chain and votes are set to empty lists and the first block is created. The first block's proof is
1and the previous hash is'0'. The block itself is created increate_genesis_block. - A method to create a block, where we use the foundation from earlier to create a new block and append it to the end of the chain. We pass in a
proofand aprevious_hashwhich are defined elsewhere. - A method to add a vote, which simply appends a
voter_idand acandidateto the voting list. - A method to implement a proof of work algorithm. This involves repeatedly calculating the SHA-256 hash of the concatenation of
last_proofandproof, which is converted to a string and encoded to bytes before being hashed. If the resulting hash starts with four zeroes, it is considered valid and the function returnsnew_proof. This method is a nice way to achieve consensus in a decentralized system (i.e. if we included more nodes and required a consensus step). - A method to quickly calculate the hash, which dumps and encodes the json blocks of a
blockand returns the SHA-256 hash of that block. Note thatsort_keys=Truein this demonstration. - A method to get the previous block, which returns the element block just behind the head of the chain. Later this method becomes a
@propertyof theBlockchainclass.
On the frontend, we expose this functionality via Flask routes. Here are some of the initial routes I created:
- /vote [POST], which captures a
voter_idandcandidate, adds a vote to the blockchain, then returns201 Created. For convenience, I changed this method later to automatically mine a new block after casting a vote, condensing potentially multiple endpoints into one. - /votes [GET], which extends each block in the chain and extracts its votes. Returns the content of all votes as well as
200 OK. - /mine [GET], which captures the previous block's
proofand uses that to create a new block. Returns200 OK. - Various helper methods to view the chain, pending votes, and candidates. These will be incorporated later in our frontend.
Scaffolding the Frontend
Now that the backend has been assembled, I needed a UI to put everything together. I settled on native React, which interfaces seamlessly with the backend Flask API. Key features of the React frontend include:
- Definition of global constants for candidate images and background colors.
- Inclusion of
useStatehooks to track error and success messages. - A method to retrieve the voter ID from local storage, which generates a new ID using a combination of the current date and a random number as a fallback. Note that in production a more robust UUID library would be used to avoid collisions.
- A method to cast a vote, which calls on the
/voteand/mineroutes to add a block to the chain, mine a new block, and effectively cast a vote. - A primary modal to display the frontend and allow users to vote in the poll.
Later in development, the following features were added:
- A leaderboard to show which candidate is leading in the poll. This required a new backend method, Flask API route, and an accessor/mutator in the frontend.
- The use of
useEffect + setIntervalto constantly refresh the leaderboard, which is helpful when the poll is highly active and many votes are being cast. - Axios, a promise-based HTTP client used to interface with the backend and provide runtime flexibility.
- A persistent datastore to save the results of the poll and easily reset the votes when a new topic is chosen
- Rate limiting with
flask-limiterto mitigate DoS and keep the datastore in check
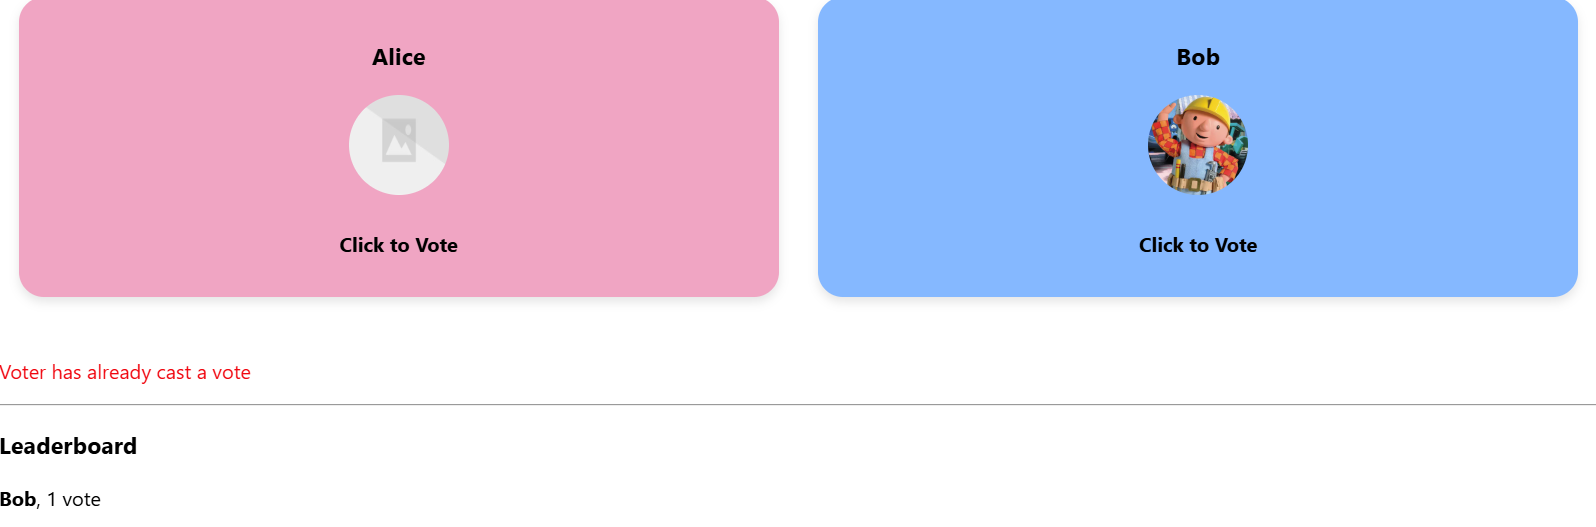
An early version of the voting modal is shown below.
Where does it live?
The next challenge was figuring out where to host the voting platform. It needed to be in a location that could run the Python backend and React frontend yet reserve resoruces and only serve the product when necessary. Railway addressed these needs by offering a platform that could host my infrastructure and serve it over the Internet. Railway provided some solutions that helped me bring my project into production:
- A static service URL for hosting the frontend and backend, allowing the frontend to communicate with the backend without manual domain setup.
- Containerization via Docker, keeping my code safe, deployable, and scalable for high user load.
- Direct integration with GitHub, redeploying containers when new commits are made and taking snapshots of previous commits in the event of rollback.
- The concept of Monorepo, allowing my frontend and backend services to live in different root directories in GitHub and exist within one Railway project.
- Direct SQL database interactivity to easily spin up data stores in a variety of flavors and interact with them in just a few clicks. For this project, I chose MySQL.
- Serverless instances, which helped me conserve resources by spinning down and "sleeping" instances when not in use.
- An attractive one-time $5 credit which allowed me to prototype my solution with no financial impact.
- Deployment logs and metrics, which were useful when my frontend and backend had issues that required debugging.
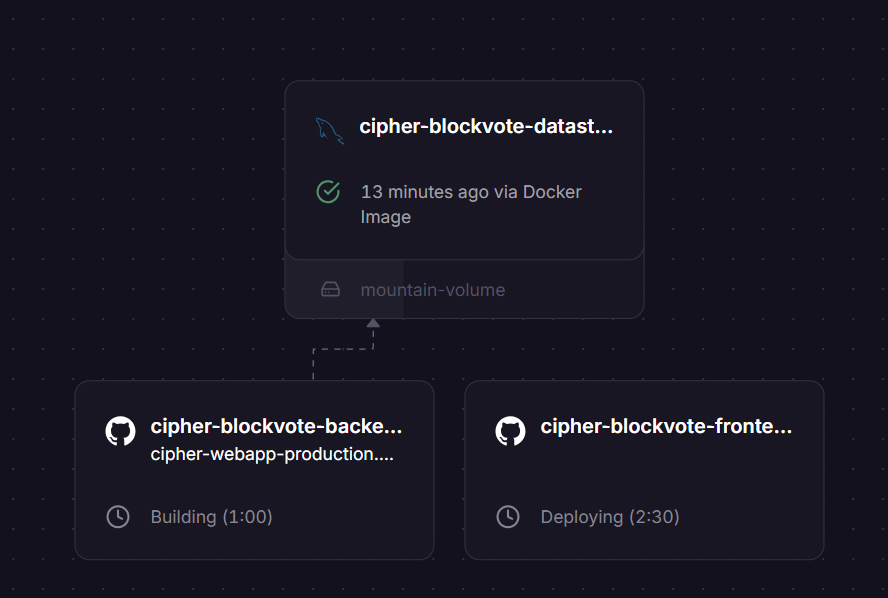
Currently, my project sits within one GitHub repo. I made subfolders for the frontend and backend, storing the required files in each, and used Railway's Monorepo solution to host two endpoints for each subfolder. I have included an iframe below showing the finished product, which you can find here.
What's Next?
In my next article in the Adventures in Cryptography series, I will cover some experiments in quantum cryptography and the creation of a cryptanalysis engine to encode text, decode ciphers, and take a guess at which cipher a given text is encoded in. There's plenty more content to explore in the world of cryptography!
Sources
OpenAI: header image
Springer.com: "More Efficient Match-Making and Satisfiability: The Five Card Trick, Bert den Boer, 1989.
Published May 2025